The Ultimate Guide to Spray Painting Kitchen Cabinets
The Ultimate Guide to Spray Painting Kitchen Cabinets: Step-by-Step Tutorial for a Stunning Kitchen Upgrade 🎨🔧
Part 1: Preparing for the Project 🛠️🔧
Step 1: Gather Supplies and Tools 🎒🔧
Before diving into your spray painting project, gather all the necessary supplies and tools:
HVLP (High-Volume Low-Pressure) paint sprayer or airless sprayer
High-quality paint suitable for cabinets (acrylic latex or oil-based enamel)
Primer (if needed)
Fine-grit sandpaper (320 grit)
Tack cloth
Painter's tape
Drop cloths or plastic sheets
Screwdriver
Wood filler and putty knife (for patching imperfections)
Mild detergent or TSP (trisodium phosphate)
Clean rags
Protective gloves and eyewear
Well-ventilated workspace or outdoor area
Step 2: Remove Cabinet Hardware and Clean 🚪🧼
Start by removing all cabinet doors, drawers, and hardware such as handles, knobs, and hinges using a screwdriver. Label each piece or create a map to ensure easy reassembly later.
Next, thoroughly clean all cabinet surfaces using a mild detergent or TSP. Remove grease, grime, and dirt, and then rinse with clean water. Allow the cabinets to dry completely.
Step 3: Sand the Surfaces 🛠️🪚
Lightly sand all cabinet surfaces, including doors and drawers, using fine-grit sandpaper (320 grit). Sanding creates a slightly rough surface, allowing the paint to adhere better. After sanding, wipe away the dust with a tack cloth to ensure a clean surface for painting.
Step 4: Patch Imperfections (if needed) 🛡️🔧
Inspect the cabinet surfaces for any holes, dents, or imperfections. Use wood filler to fill in these areas and a putty knife to smooth the surface. Allow the filler to dry completely, and then sand it until it is flush with the cabinet surface.
Step 5: Protect Surrounding Areas 🎨🛡️
Cover countertops, floors, and other surfaces near the cabinets with drop cloths or plastic sheets to protect them from overspray and accidental paint splatters.
Part 2: The Spray Painting Process 🎨🔧
Step 6: Choose the Right Sprayer 🖌️🎨
Select either an HVLP paint sprayer or an airless sprayer based on your experience and the size of the project. HVLP sprayers are great for beginners, as they provide more control over the paint flow and reduce overspray.
Step 7: Mix and Load the Paint 🎨🔧
If your paint requires mixing or thinning, follow the manufacturer's instructions. Fill the sprayer's paint container with the prepared paint, leaving some space for air circulation.
Step 8: Practice Test Sprays 🎨📝
Before spraying the cabinets, practice on a spare piece of cardboard or wood to get comfortable with the sprayer's settings and spray pattern. Adjust the flow and fan pattern to achieve your desired spray width.
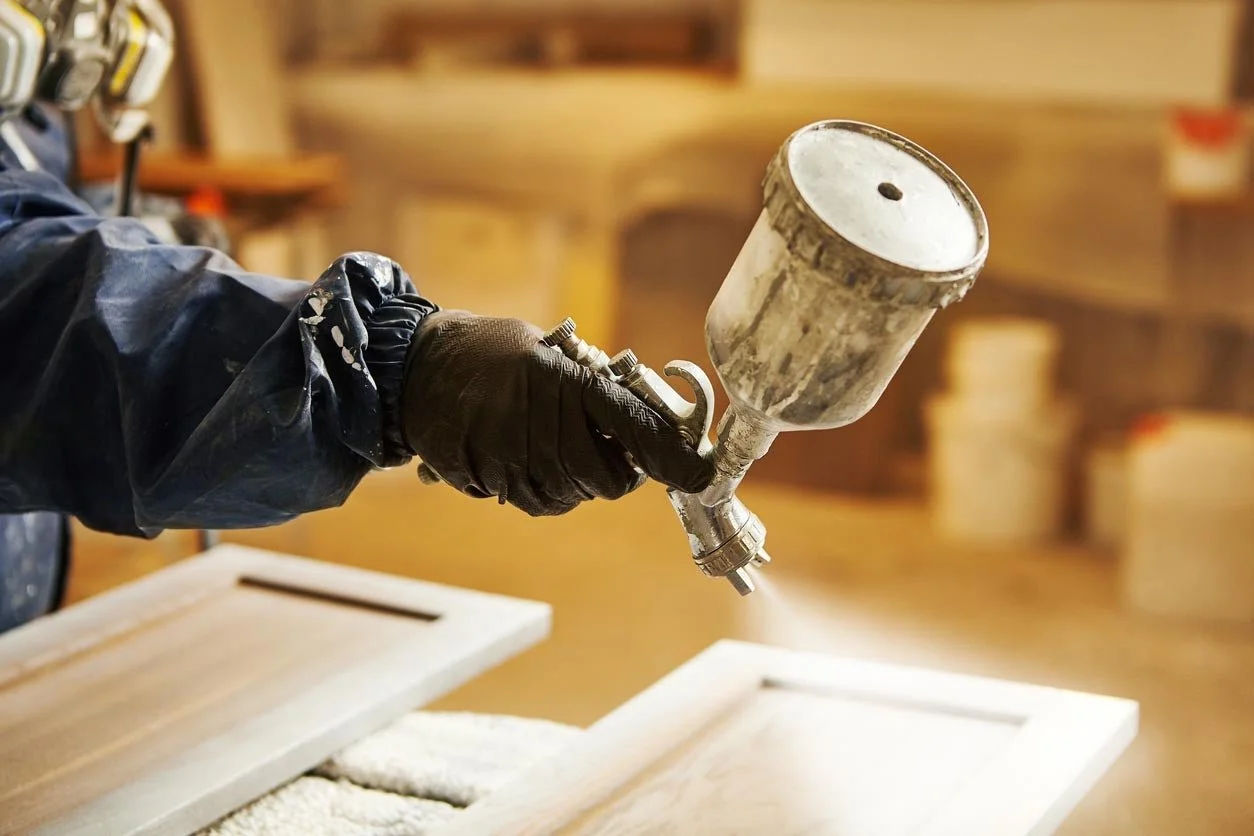
Step 9: Spray the Cabinets 🎨🔧
Start by spraying the cabinet frames, working from top to bottom. Hold the sprayer about 8-12 inches away from the surface and apply the paint in smooth, even strokes. Keep the sprayer in motion to avoid paint buildup.
Step 10: Spray the Cabinet Doors and Drawers 🚪🔧
Once the frames are dry, flip the cabinet doors and drawers over, and repeat the painting process on the other side. Be sure to apply thin and even coats for a professional finish.
Step 11: Apply Additional Coats (if needed) 🎨🔧
Allow the first coat to dry completely before applying additional coats. Depending on the paint and desired coverage, two to three coats may be necessary for an even finish.
Step 12: Let the Cabinets Dry and Reassemble 🛠️🔧
After the final coat, allow the cabinets to dry thoroughly following the paint manufacturer's recommended drying times. Once dry, reattach the cabinet hardware, doors, and drawers. Ensure proper alignment before tightening screws.
Step 13: Finishing Touches and Final Inspection 🏁🎨
Inspect the cabinets for any imperfections or areas that need touch-ups. Use a small brush to address any blemishes and ensure a flawless finish.
Part 3: Additional Tips for a Professional Finish 🌟📝
Maintain Consistent Spraying Speed: To ensure an even coat, maintain a consistent spraying speed throughout the process. Rapid or slow spraying can lead to uneven coverage and paint buildup.
Overlapping Strokes: When spraying, overlap each stroke slightly to avoid leaving gaps and achieve seamless coverage.
Proper Angles: Hold the sprayer at a 90-degree angle to the surface for consistent paint application. Tilting the sprayer can cause uneven coverage.
Practice Feathering: To avoid hard lines between strokes, practice feathering - gradually releasing the trigger at the end of each stroke to blend with the previous one.
Multiple Passes: For a uniform finish, make multiple passes over the same area instead of trying to cover everything in one pass.
Part 4: Troubleshooting and Solutions 🛠️🔧
Uneven Coverage: If you notice uneven coverage or light spots after the paint dries, apply additional thin coats until the desired finish is achieved.
Drips and Runs: To fix drips and runs, lightly sand the affected area after the paint dries, then touch up with a small brush using the same paint.
Clogged Nozzle: If the sprayer's nozzle becomes clogged, clean it immediately with a small brush or by removing the nozzle and soaking it in warm water.
Overspray: Reduce overspray by adjusting the sprayer's settings, using slower spraying speeds, or creating a spray booth using plastic sheets.
Paint Bleeding: If paint bleeds through the painter's tape, ensure the surface is clean and dry before applying the tape. Consider using low-tack or delicate surface painter's tape for better adhesion.
Part 5: Finishing Touches and Beyond 🏁🎨
Allow Sufficient Drying Time: Be patient and give the cabinets ample drying time between coats and before reassembly. Rushing the process can lead to smudges and blemishes.
Top Coat (Optional): For added protection and durability, consider applying a clear top coat or polyurethane finish over the painted cabinets.
Maintain Your Cabinets: Once your cabinets are complete, maintain them with gentle cleaning and avoid using abrasive or harsh cleaning agents to preserve the finish.
Consider Hardware Upgrade: As a final touch, consider updating cabinet hardware with modern and stylish handles or knobs that complement the new look of your cabinets.
Part 6: Where to Buy Paint and Painting Tools 🛒🎨🔧
Finding the right places to purchase high-quality paint and painting tools is essential to ensure a successful spray painting project. Here are some excellent options for buying paint and the necessary tools:
Paint Stores and Home Improvement Retailers 🏢🎨
Visit dedicated paint stores like Sherwin-Williams, Benjamin Moore, or Behr for a wide selection of high-quality paint in various finishes and color options. These stores often have knowledgeable staff who can assist you in choosing the right type of paint for your cabinets. Additionally, major home improvement retailers like The Home Depot and Lowe's also offer an extensive range of paint products and painting tools suitable for DIY projects.
Online Retailers 🌐🛍️
E-commerce platforms like Amazon, Wayfair, and other online paint retailers have a vast selection of paint products, including those from popular brands and various paint tools. Buying paint online allows you to conveniently compare prices, read customer reviews, and have the products delivered to your doorstep.
3.Rental Stores for Sprayers and Equipment 🚚🔧
If you don't already own a paint sprayer, consider checking with rental stores for equipment availability. Rental stores often offer sprayers and other painting equipment for short-term use, which can be cost-effective for one-time projects.
4.Local Painters and Contractors 🎨🏠
Local painters or contractors who offer spray painting services may have access to high-quality paint and sprayers. If you prefer not to undertake the spray painting project yourself, consider reaching out to these professionals for assistance.
Conclusion 🏁🎉
Congratulations! You've successfully spray painted your cabinets, giving your kitchen a stunning upgrade with a professional finish. By following this step-by-step guide and using high-quality paint and the right sprayer, you've achieved a cost-effective and rewarding transformation of your living spaces.
Remember to take your time and practice spray techniques to ensure smooth application. With the right preparation and technique, your spray-painted cabinets will be the envy of all who see them. Enjoy your newly upgraded kitchen and revel in the satisfaction of a job well done! 🎨🏠✨ #SprayPaintingCabinets #DIYProjects #KitchenUpgrade